

This is going to be a very long post! But this was a great challenge though!

The 2010 February Daring Cooks’ Challenge was hosted by Michele of Veggie Num Nums. Michele chose to challenge everyone to make mezze based on various recipes from Claudia Roden, Jeffrey Alford and Naomi Dugid.
Pita Bread – Recipe adapted from Flatbreads & Flavors by Jeffrey Alford and Naomi Duguid
Hummus – Recipe adapted from The New Book of Middle Eastern Food by Claudia Roden
Cucumber Raita – Recipe adapted from The Indian Grocery Store Demystified by Linda Bladholm
Falafels - Recipe from Joan Nathan and Epicurious.com
Preserved Lemons – Recipe from Paula Wolfert and Epicurious
*Mezze is a Middle Eastern way of serving a selection of small dishes or appetizers all at once.
The pita bread and hummus were mandatory and the rest were up to your creativity and imagination.
My mezze was a vegan one and consisted of:
- Half wholewheat and half white flour pita
- Vegan cucumber raita (with basil and coconut milk)
- Mushroom and sweetcorn cannelli bean humous
- Dhal-chili cake
- Preserved lemons with green chilies and whole black pepper (these were not pickled enough to be eaten on the day, but now they are delicious!)
- Sauteed broccoli and asparagus
Much to my surprise this challenge didn't really take much of my time! Just the usual time I take to make dinner (well, except for the waiting time of the pita bread to rise...). I actually took more time to write this post and the recipes!
Pita Bread
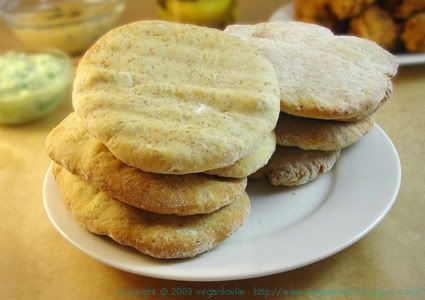
For the pita bread, I pretty much used the recipe provided in the challenge which is adapted from Flatbreads & Flavors by Jeffrey Alford and Naomi Duguid
I did not follow the exact measurements of water and flour as these need to be adjusted anyway while making the dough. I also omitted the olive oil in the recipe (because I forgot to add it in!) and it didn’t make a difference.
Ingredients (about 16 pita breads, depending on size)
2 teaspoons regular dry yeast (.43 ounces/12.1 grams)
2.5 cups lukewarm water (21 ounces/591 grams)
5-6 cups flour (50% whole wheat and 50% strong white flour) (17.5 -21 ounces/497-596 grams)
1 tablespoon table salt (.50 ounces/15 grams)
2 tablespoons olive oil (optional)
- In a large bread bowl, sprinkle the yeast over the warm water. Stir to dissolve. Stir in 3 cups flour, a cup at a time, and then stir continuously for about 1 minute, in the same direction to activate the gluten. Let this sponge rest for at least 10 minutes, or as long as 2 hours. (I left mine for more than an hour).
- Sprinkle the salt over the sponge and stir in the olive oil at this point (if adding). Mix well. Add more flour, a cup at a time, until the dough is too stiff to stir. Turn it out onto a lightly floured surface and knead for 8 to 10 minutes, until smooth and elastic. Rinse out the bowl, dry, and lightly oil. Return the dough to the bowl and cover with plastic wrap. Let rise until at least doubled in size, approximately 1 1/2 hours.
- Place a two small baking sheets (I used a pizza tray), on the bottom rack of your oven, leaving a 1-inch gap all around between the sheets and the oven walls to allow heat to circulate. Preheat the oven to 230 degrees Celsius (450F).
- Gently punch down the dough. Divide the dough in half, and then set half aside, covered, while you work with the rest. Divide the other half into 8 equal pieces and flatten each piece with lightly floured hands. Roll out each piece to a circle 8 to 9 inches in diameter and less than 1/4 inch thick. Keep the rolled-out breads covered until ready to bake, but do not stack.
- Place 2 breads, or more if your oven is large enough, on the tray or baking sheets, and bake for 2 to 3 minutes, or until each bread has gone into a full balloon (I left my pitas to bake for more than 5 minutes though, because I didn’t think they were ready yet). If for some reason your bread doesn't puff up (some didn’t in my case), don't worry it will still taste delicious.
- Wrap the baked breads together in a large kitchen towel to keep them warm and soft while you bake the remaining rolled-out breads. Then repeat with the rest of the dough.
Mushroom and Sweetcorn Canelli (or white) Bean Humous (or dip)
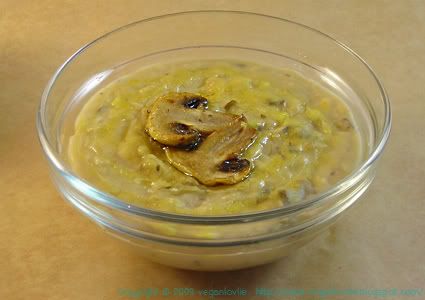
Mushrooms and sweetcorn were sauteed then mixed with the cannelli bean pate. This was a nice change to traditional chickpea humous.
These are not exact measurements. I didn’t weigh the ingredients but just used the cup.
Ingredients
1 cup canelli beans (boiled to almost a mush)
1 tablespoon olive oil
1 tablespoon vegan margarine
½ teaspoon cayenne pepper
Salt and pepper to taste
1 cup chopped mushrooms
2 tablespoons frozen (or canned) sweetcorn
75 ml water (more or less)
- Heat the margarine on medium. Add in the mushrooms and sweet corn. Sautee for a few minutes.
- Place the rest of the ingredients in a blender. Blend to a smooth paste.
- Add more water if necessary to desired consistency.
- Add in mushrooms and sweetcorn. Serve warm or cold.
Vegan Cucumber Raita
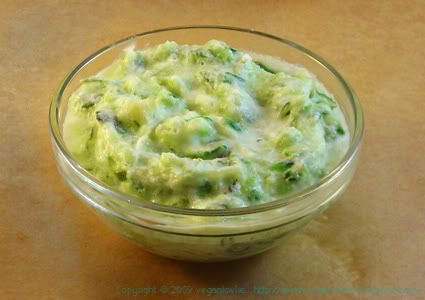
Raita couldn’t be easier to make! Traditional raita is made with yogurt. It is so easy to veganise this with coconut milk. I didn’t use any garlic in the raita but you can add some finely chopped garlic or garlic powder to yours if you like.
Ingredients
1 whole green cucumber (I didn’t peel it or remove the seeds because they were very tender, but you can do so if you prefer)
Few leaves basil, finely chopped
5 tablespoons coconut cream (if using coconut milk, you may want to increase the amount and remove more juice from the cucumber)
¼ teaspoon salt (or to taste)
A few dash ground black pepper
- Grate the cucumber. Squeeze out some of the juice from the cucumber. (You can save the juice for drinking or use it in your green smoothies! But don’t keep it for too long before consuming.)
- Add in the rest of the ingredients. Keep chilled until ready to serve.
Dhal-chili Cake

This is a regular Mauritian favourite at Lovlie’s Cocoon! I’ve posted some recipes about these before (here in a soup and another version here). I usually customize these cakes slightly with whatever I have on hand when I’m doing them.
This time I used fresh basil as herb. And wow! What flavour combo! I think the best dhal-chili cake I’ve made so far.
Ingredients (approximately 25 cakes)
1½ cups (250g) channa dhal (yellow split is also fine) soaked for at least 8 hours (preferably overnight)
1 small onion, finely chopped
10 - 12 basil leaves (or 2-3 stems with the leaves), finely chopped
¼ teaspoon aniseed
5 green chilies chopped (adjust quantity to your taste)
Salt to taste
Vegetable oil for frying
- Drain dhal completely. Grind the dhal to a paste in a food processor or blender to a combination of fine and not so fine consistency. (There must be enough fines to bind the chili cake together).
- Add the rest of the ingredients – onion, basil, chilies and salt.
- Mix well. This is best mixed by hand.
- Preheat oil on medium heat.
- Drop the dough in small loose balls in the hot oil. (Do not compress the dough balls too much otherwise the centre will remain uncooked).
- Turn occasionally until golden brown. Adjust heat if necessary to ensure thorough cooking.
- Remove and allow to drain on kitchen absorbent paper to absorb the extra oil.
Preserved Lemons
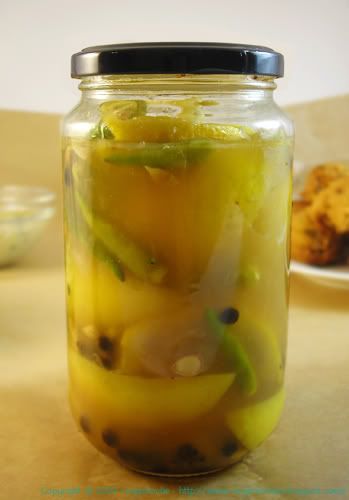
They remind me of my Mum who used to make huge jars of preserved lemons that we would use in salads, chutneys or just accompaniment.
The challenge recommended Meyer lemons. “To most closely approximate the flavour of Moroccan lemons, Wolfert recommends Meyer lemons for this recipe. This lemon/mandarin orange hybrid, in season in January and February, has yellow-orange flesh, a smooth rind, and a sweeter flavour than other lemons.”
I couldn’t find those so I just used organic unwaxed lemons.
Ingredients
5 lemons
¼ cup salt (2 ounces/60 grams)
1 teaspoon whole peppercorns
10 whole green chilies
Freshly squeezed lemon juice to taste, only if needed
Rice vinegar, (optional) if required
Special Equipment: 1 pint Mason Jar – Sterilized. I just sterilized an empty jam jar.
- Quarter the lemons, sprinkle salt on the exposed flesh.
- Place 1 tablespoon salt on the bottom of the jar. Pack in the lemons and push them down, adding more salt, and the peppercorns and chilies between layers. Press the lemons down to release their juices and to make room for the remaining lemons. (If the juice released from the squashed fruit does not cover them, add freshly squeezed lemon juice or I added some rice vinegar — not chemically produced lemon juice and not water.)
- Leave some air space before sealing the jar.
- Let the lemons ripen in a warm place, shaking the jar each day to distribute the salt and juice. Let ripen for 30 days.
- To use, rinse the lemons, as needed, under running water, removing and discarding the pulp, if desired — and there is no need to refrigerate after opening. Preserved lemons will keep up to a year, and the pickling juice can be used two or three times over the course of a year.
Lovely mezze! Those dhal chile cakes just look fantastic! I love your creative approach to the challenge, everything looks delicious!
ReplyDeleteBeautiful job... or should I say lovlie? ;)
ReplyDeleteYour mezze looks fabulous and it only took the normal amount of time as a normal meal well done. Your pita bread is nice and thick superb effort and I love the Dhal-chili cakes they look extra delicious. Cheers from Audax in Sydney Australia.
ReplyDeletegreat blog and amazing pics! I'm new to food blogging and you can find me on http://inspiredtobake.wordpress.com/ Not as awesome as urs though haha
ReplyDeleteThank you so much for making mezze with me this month!
ReplyDeleteI really love your blog. Your food is so gorgeous and your recipes are really inventive.
Your mezze looks fantastic and I'm going to try the dhal-chili cakes and the mushroom hummus. Yum!
I love making mezze... so many delicious options to choose from! I've posted ideas for mezze before, but I love your variations! Everything looks delicious.
ReplyDeleteLOVELY!
ReplyDeletehttp://nuestracena-vegancuisine.blogspot.com
I'm Indian and I've never tried vegan raita, that looks lovely!!
ReplyDelete