Join the Veganlovlie Cocoon!
Receive an occasional burst of sunshine and a little flower, recipes, craft projects and FREE resources.
Showing posts with label Daring Kitchen. Show all posts

Wednesday, 27 October 2010

Let's go nuts for doughnuts! A Daring Baker's Challenge

vegan donut

This month the Daring Bakers were challenged to make doughnuts! Woo hoo! With the cold weather gradually setting in, these sugary treats are quite welcome. I tried hard not to eat too many; they turned out really good!

The Daring Kitchen

DARING BAKERS OCTOBER 2010 CHALLENGE: LET'S GO NUTS FOR DOUGHNUTS!

The October 2010 Daring Bakers challenge was hosted by Lori of Butter Me Up. Lori chose to challenge DBers to make doughnuts. She used several sources for her recipes including Alton Brown, Nancy Silverton, Kate Neumann and Epicurious.

I am not including a recipe this time as I would like to test this recipe one more time before posting it. The dough was a vegan (of course) baked yeast based one. The doughnuts were soft and fluffy, although best eaten the same day.

I'll be back with the recipe some time soon.

vegan donut

Tuesday, 28 September 2010

September 2010 Daring Baker's Challenge: Decorated Sugar Cookies (or my Mauritian Napolitaines recipe)

sugar cookies,napolitaine

This month's Daring Baker's Challenge was set on a theme and the theme was September. September meaning whatever the month of September means to us (the Daring Bakers). Well, for me September started with some not so good news (if I put it that way) as Mum required urgent surgery. But everything went fine and she is now recovering. So, my theme for September is Mum's recovery. I was not in my home country to support her so I dedicate these sunflower decorated sugar cookies to her. Sunflowers are her favourite flowers! And yellow hearts, yellow being her favourite colour.

The Daring Kitchen

DARING BAKERS SEPTEMBER 2010 CHALLENGE: DECORATED SUGAR COOKIES

The September 2010 Daring Bakers’ challenge was hosted by Mandy of What the Fruitcake?! Mandy challenged everyone to make Decorated Sugar Cookies based on recipes from Peggy Porschen and The Joy of Baking.

The sugar cookies I made are based on a famous Mauritian cookie recipe. We called them Napolitaines. They are basically buttery soft cookies, sandwiched with a layer of jam and iced with a sugar coating. Apart from the icing, they are usually not decorated and coloured pink (although all sorts of variations exist). For an authentic Mauritian flavour, 1-2 tablespoons of rum is added to the dough. I omitted this however. Also I couldn't find any vegan red food colouring over here, so I just used the strawberry jam itself as colouring agent in the icing.


Decorated Sugar Cookies (Mauritian style - Napolitaines) (About 15 cookies)
300g sifted white flour
180g vegan margarine (cold)
2 - 3 tablespoons raspberry or strawberry jam (for spreading on the cookies)
1 tablespoon rum (optional)

For the icing:
300g icing sugar
30 ml water at room temperature
Strawberry jam for pink colouring (or a few drops vegan red food colour)
Pinch pf curcuma powder (the yellow colouring from turmeric) for yellow colouring
Melted chocolate (just place 1-2 squares in the microwave)


Place margarine into the flour. Cut into tiny pieces then rub with the fingers to make a soft dough.(Use a little more margarine if necessary but do not use water). Sprinkle in the rum (if using). Wrap up the dough in plastic wrap and refrigerate for 30 minutes.

Preheat oven 180 degrees Celsius.
Roll dough out on a lightly floured surface to a thickness of about 4 mm. Cut small circles, about 5 cm in diameter from it.

Re-roll trimmings and cut more circles.

Place them on lightly greased baking sheets and bake until cooked but still beige in colour, not brown. Allow to cool.

When cooled, spread jam over half of the cookies and cover with the remaining ones.

sugar cookies,napolitaine

Mix the water with the icing sugar to make the icing. Leave some white. Divide the rest into 2 parts. Add a little jam to obtain the pink colour and a little curcuma for the yellow colour.
Adjust the consistency using more icing sugar (if too thin) or water (by drops, if too thick.
Mix well until a consistent colour is formed.

To test consistency, drop some on the cookies, it should take about 10 seconds for the icing to cover the cookie including the sides. You'll need to slightly lift the spoon and tap it again on the top icing and around the edge to allow the icing to overflow on the sides.

sugar cookies,napolitaine

Ice the whole batch of cookies. Leave iced cookies to dry for a few hours or preferably overnight before doing the decorations. (If so, you may want to do the yellow coloured icing the next day).

sugar cookies,napolitaine

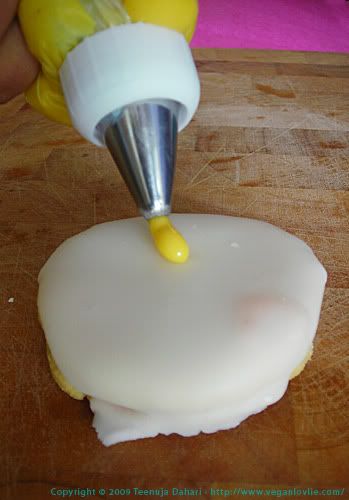
To decorate with flowers, I used medium piping tip.

sugar cookies,napolitaine

Work from the centre outwards then coming back to finish in the centre.

sugar cookies,napolitaine

Drop some melted chocolate in the centre with a toothpick.

sugar cookies,napolitaine


Enjoy!

sugar cookies,napolitaine

Sunday, 19 September 2010

DARING COOKS 2010 CHALLENGE: FOOD PRESERVATION: THE APPLE BUTTER OF KNOWLEDGE

apple butter,daring kitchen,daring cooks

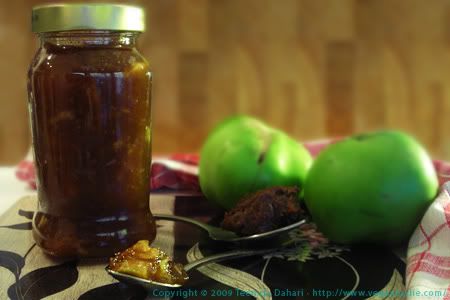
I am posting this 5 days late! Not that this was a tedious recipe to make. It was infact very easy and quick. Because I am allergic to nuts, I regularly make fruit butters to use as spreads. I have made apple butter a lot of times before and I like mixing it with other fruits.
This time I mixed it with some tamarind paste for a distinctive sweet and sour taste.
I really like this combination and more often I find myself eating a spoonful as dessert rather than a breakfast spread! The slight sour taste also makes it really good to use as a dipping sauce with corn chips or poppadums!

The Daring Kitchen

The September 2010 Daring Cooks’ challenge was hosted by John of Eat4Fun. John chose to challenge The Daring Cooks to learn about food preservation, mainly in the form of canning and freezing. He challenged everyone to make a recipe and preserve it. John’s source for food preservation information was from The National Center for Home Food Preservation.


DARING COOKS 2010 CHALLENGE: FOOD PRESERVATION: THE APPLE BUTTER OF KNOWLEDGE


For this recipe I used Irish Bramley apples. Bramley apples are usually slightly larger than a common regular apple and they have a tangy taste. They are mostly used as cooking apples in pies or crumbles.

Because I tend to eat these butters quite quickly, I don't usually use elaborated methods of preservation and these butters usually keep for up to 3 weeks in the fridge.

Bramley Apple Butter (with a hint of tamarind)
3 bramley apples (peeled and seeds removed, finely chopped/sliced)
1 tablespoon tamarind paste (seeds removed, dilute with a little water to make it easier to remove the seeds)
1 cup sugar

  • Place all ingredient in a non stick pan, cover and cook for 20 minutes or until apples are soft enough to mash. Occasionally add water if required to allow the apples to cook and not burn.
  • After cooking, you can either mash in a blender, with a hand blender or with a wooden spoon (which I did, as I like some chunky pieces to be left).
  • Put back in the pan and reduce to desired spreadable consistency.
  • Allow to cool then place in sterilised (boiled in water, then left to dry) pots and keep refrigerated.

Wednesday, 14 July 2010

DARING COOKS JULY 2010 CHALLENGE: NUT BUTTERS

asian salad

When I first saw this challenge, I thought oh no! Not a nut challenge! I am allergic to both nuts and seeds, although I do cheat and eat them from time to time in small quantities and hope that I don't fall sick! Haha! Ok, it's not funny when I do fall sick!

Anyway, I did not want to take any risk. Then, I saw that this challenge allowed fruit butters as well for nut allergy sufferers! I could have made a bean butter with chickpeas but I used this for a previous challenge to replace nuts in a satay. So I thought I'd try a fruit butter instead.


Fruit butter is similar to making jam except that it doesn't require any jellying agent and uses much less sugar. However, it is cooked for 2 hours. I was short of time. So, I only cooked it for 1/2 hour and it was fine. I only made a small quantity and did not add any extra liquid to the fruits, so it dried up quicker.


The Daring Kitchen

The July Challenge is brought to you by Margie of More Please and Natashya of Living in the Kitchen with Puppies.


DARING COOKS JULY 2010 CHALLENGE: NUT BUTTERS


This was a pretty quick challenge to make. I decided I would use my fruit butter as a dressing for an Asian salad. I made the fruit butter a few days before and had used half of it by the time I took the photo!


Apple and Pineapple Fruit Butter

I am not providing an exact recipe for the fruit butter as I can't remember the quantities I used! But I don't think quantities matter that much as basically the fruits are pureed, sweetened a little bit, water added, then cooked for 2 hours. In my case, I only cooked it for half an hour.

So, I took 2 apples, peeled and cut them into small pieces. I used about 1/2 pineapple, peeled and also cut into small pieces. Place all fruits in a blender and process to a puree (a hand blender is also fine for this). Add 2-3 tablespoons sugar and place in a thick bottom pan. Cook on low-medium heat for 30 minutes or until thick enough to use as a spread.


fruit butter

Asian Salad

I don't have an exact recipe for the quantities of the salad ingredients as I just picked and tossed in what I had on hand. Roughly for 2 persons, here are what I used:

200g Sweet potato noodles (boiled until soft, then rinse in cold water to prevent them from glueing with one another)
1 medium sized carrot (finely sliced with the vegetable peeler)
Mixed peppers (sliced)
150g frozen broad beans (immersed in boiling water for 10 minutes, then drained)
4-5 radishes (sliced)
70g raw green beans (sliced with the bean slicer)

Toss and blend everything together in a big salad bowl.

Fruit Butter Asian Salad Dressing

1 tablespoon fruit butter
1 teaspoon wasabi paste
1 tablespoon dark soy sauce
1/2 teaspoon (or to taste) fine chili powder
1 tablespoon rice vinegar
1 tablespoon fruit syrup (or maple syrup/agave nectar)
Salt to taste

Mix all ingredients together.

Pour on salad just before serving.

asian salad

Sunday, 13 June 2010

Daring Cooks Challenge June 2010: Pâtés and Bread


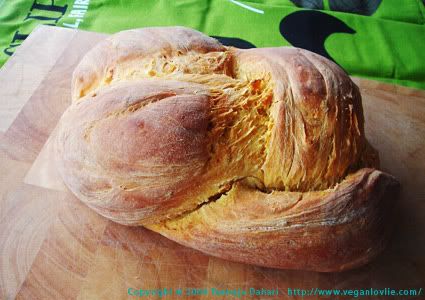
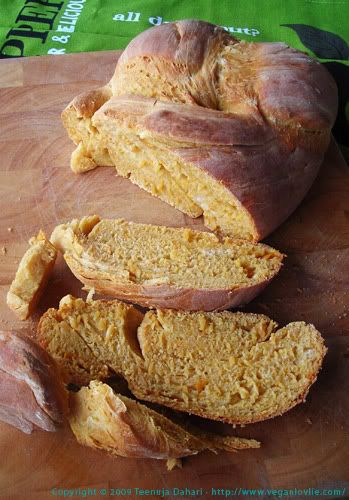
This month's challenge was different from what I expected but I liked it. I kind of make bean spreads quite often but never actually made a bean pâté before. The result was quite tasty I must say! However, the pâté is supposed to be eated cold with bread to go with the summery weather, in the northern hemisphere at present. Well, in Ireland, it's not very summery at the moment, despite being in the northern half of the planet. And especially, I chose to do this challenge just on the eve of the posting date. It was rainy and not warm. So, I decided to make a warm hearty bread to compensate - Sweet Potato Bread. And my, was that tasty! I'm not a great fan of bread in general but I am a fan of sweet potato and BoyfriendLovlie is quite the contrary. With this bread, it seems like we found common ground!


The Daring Kitchen

Our hostesses this month, Evelyne of Cheap Ethnic Eatz, and Valerie of a The Chocolate Bunny, chose delicious pate with freshly baked bread as their June Daring Cook’s challenge! They’ve provided us with 4 different pate recipes to choose from and are allowing us to go wild with our homemade bread choice.

THE DARING COOKS JUNE 2010 CHALLENGE: PÂTÉS AND BREAD
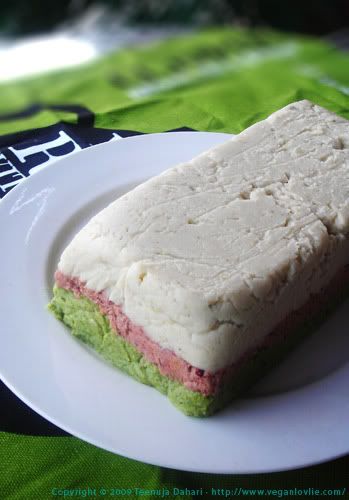
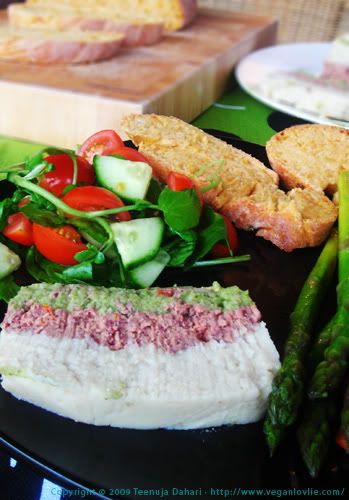
I chose to make the Tricolor Bean Pâté and it turned out tastier than I thought it would be. All three layers combined give a delicious taste. And eaten as a spread on the warm Sweet Potato Bread, it was just perfect for this moist evening.
I can't believe how easy and quick it was to whip this pâté together. I already had boiled butter beans, red kidney beans and cannelli beans. I usually regularly boil a big batch of beans, divide them into small portions and freeze them in freezer bags. This makes preparing meals that call for them so much quicker.
The pâté took me a little over half an hour to do. The bread was a very easy one but it does require about one and a half hours to rise. So, if you are making both on the same day, you may want to start with the bread first and leave it to rise while you make the pâté.

Easy Sweet Potato Bread
Ingredients
2 1/2 cups (275g) strong white flour
1 rather big sweet potato (350g)
1 sachet (7g) yeast
100ml warm water
1 teaspoon sugar
5 tablespoons rice milk (soy milk is fine too)
2 tablespoons coconut oil (melt first, if hardened, then take 2 tablespoons of the liquid oil. Vegetable oil should also be fine)
1/2 teaspoon salt

  • Place sweet potato with the skin on in the microwave and cook for 5 minutes or until soft. Prick with a fork to test. (You may also boil the sweet potato).
  • Peel and discard the skin. Mash the sweet potato to a fine puree. Set aside to cool.
  • Place yeast and sugar in warm water. Stir to dissolve and let stand for 10 minutes.
  • Meanwhile, add oil and milk to flour.
  • Add sweet potato then the yeast mixture.
  • Mix with the hand until well combined. Then knead for 8 - 10 minutes. You may want to add a little more flour if too sticky or 1 - 2 tablespoons more milk if too dry. (This also depends on the moisture content of the sweet potato.)
  • Oil a large bowl and place in the dough. Cover with cling film and leave to rise for 1 and a half hours in a warm place.
  • The dough should double in size.
  • Preheat oven to 170 degrees Celsius.
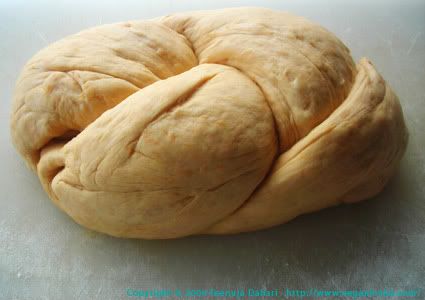
  • Divide dough into 3 equal parts. Take one part and roll into a log. How long or thick you roll it will depend on the size or length of bread you want. I made mine rather short and fat, a bit like a country style bread. So, I leave this up to you. Repeat with the other 2 pieces.
  • Join the 3 pieces at the top and start braiding. Press to secure them at the end, then reshape to nice rounded smooth ends.

Sweet Potato Bread

  • Place on a baking tray and bake for 1 hour (rotate bread 180 degrees on itself halfway through for even baking).
  • Remove from oven and allow to cool a little before slicing.

Sweet Potato Bread

Sweet Potato Bread

Tricolor Bean Pâté
Ingredients (for 1 loaf pan)
White Layer
3 cups (450g) boiled butter beans, well drained
3 - 4 pieces pickled/oil-preserved artichoke hearts
1/2 teaspoon asafoetida (optional, you may also use some dried herb seasoning)
1 tablespoon vegan cheese powder (or vegan parmesan or nutritional yeast)
1/2 teaspoon salt (or to taste)

Pink/Reddish Layer
2 cups (300g) red kidney beans
4 sundried tomato halves (I used the ones preserved in oil. If you are using dried ones, rehydrate them by soaking for a few minutes in some warm water first)1/4 teaspoon asafoetida (optional, you may also use some dried herb seasoning)
1 tablespoon vegan cheese powder (or vegan parmesan or nutritional yeast)
1/4 teaspoon salt

Green Layer
1 1/2 cups (250g) broccoli florets, boiled1 tablespoon vegan cheese powder (or vegan parmesan or nutritional yeast)
1/2 cup (120g) boiled canneli beans1/4 teaspoon salt

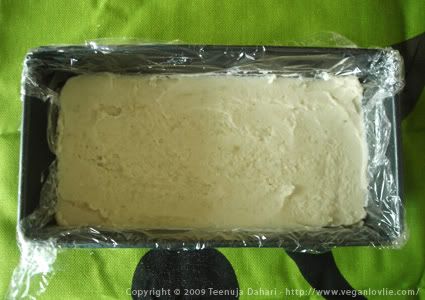
  • Start with the white layer, place all ingredients in a food processor or blender. I used a hand blender. Process to a thick puree.
  • Line a loaf pan with cling film; this is for easy demolding. Pour the puree and spread with a spoon to a smooth surface.
bean,pate,butter bean,daring cooks,daring kitchen
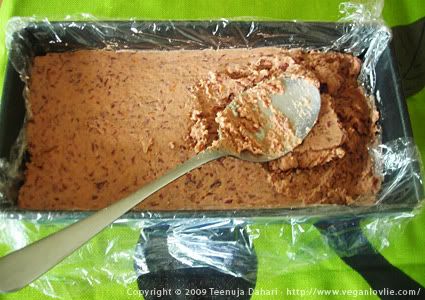
  • Repeat with reddish layer.
bean,pate,butter bean,daring cooks,daring kitchen,red kidney bean,canneli bean,sweet potato
  • Then green layer. Because I was using a hand blender, I cut the boiled broccoli as small as possible before blending them.
  • Place the loaf pan in the fridge for 4 - 5 hours.
  • Freeze for 30 minutes before demolding, slicing and serving.
bean,pate,butter bean,daring cooks,daring kitchen,red kidney bean,canneli bean

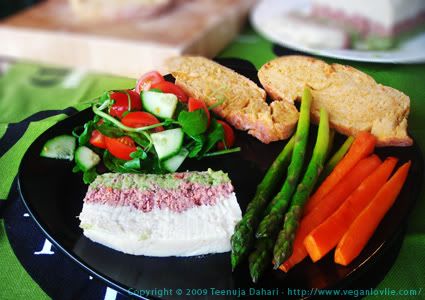
I served this pâté with sweet potato bread, salad, some asparagus and carrots both tossed for a few minutes with some margarine in the a medium hot pan.
Both the pâté and the bread is something I will definitely be making again - a request from the boyfriend!

bean,pate,butter bean,daring cooks,daring kitchen,red kidney bean,canneli bean,sweet potato

Thursday, 13 May 2010

One Great Mexican Sauce Recipe for a Daring Cooks Challenge - May 2010

vegan enchiladas

I can't believe it's been a whole month since my last post! I've been working on a few personal projects lately and been more regular to the gym, so haven't found much time for blogging. But I knew I had to do this challenge when I saw the post on the Daring Kitchen website! It was too exciting and I had never made mexican food at home before!


The Daring Kitchen

Our hosts this month, Barbara of Barbara Bakes and Bunnee of Anna+Food have chosen a delicious Stacked Green Chile & Grilled Chicken Enchilada recipe in celebration of Cinco de Mayo! The recipe, featuring a homemade enchilada sauce was found on www.finecooking.com and written by Robb Walsh.

THE DARING COOKS MAY 2010 CHALLENGE: STACKED GREEN CHILE AND GRILLED CHICKEN ENCHILADAS

Of course I replaced the chicken with tofu and vegetables. I also did not make a stack but made rolls instead. This dish was "succulent" as described by SisterLovlie, when we had this for dinner last night!
I made quite a lot of variations to the original recipe as this challenge was very versatile. The only mandatory part was to make a homemade Mexican style enchilada sauce.

The challenge called for two main ingredients for the sauce - tomatillos and green chilies. I could not find any tomatillos over here in Ireland. In fact I had never heard of these before! However, Audax (from Sydney, Australia) suggested to use green gooseberries instead. Well, I could not find any green gooseberries either and was feeling a little bit miserable. I really wanted to try something new for this challenge. And then, it seemed the Universe wanted to cheer me up! I saw a can of gooseberries in syrup on the shelf in Tesco. How cool was that?! I had never seen them before and just when I needed them, they were there smiling at me on the shelf! Now, I only know Audax on the blogsphere through the Daring Kitchen, but at that moment I thought, they must have been sent by Audax himself! Hahaha!

Canned Gooseberries

As for the chilies, I used a combination of green and red.

One thing I wasn't really sure of is whether these canned gooseberries would be too sweet for the sauce since they were in syrup. But I hoped they would be fine. I opened the can and quickly tasted one. Great! I thought they would be perfect for this sauce. They still retained a bit of tartness and were slightly sweet from the syrup.

Canned Gooseberries

So, the rest of the ingredients for these enchiladas were green beans, aubergine, tamarind paste, tortillas (I used store bought ones). You can't see a can of tomatoes in the picture as I added them in later on when the sauce tasted way too hot and also I did not have enough sauce from using just one can of gooseberries, I realised! I bravely grilled a whole batch of chilies only to use but four in this sauce; it was already too hot!

green beans,aubergine,tofu,tamarind paste,chilies,gooseberries,tortillas

Tofu and Vegetable Enchiladas in Chili, Gooseberry and Tomato Sauce

Ingredients (6 enchiladas)

1 can gooseberries (reserve the syrup)
4 green and red chilies (not peppers)
1 can tomatoes
1 tablespoon tamarind paste (remove seeds if required, by diluting the paste in water)
1 teaspoon grated fresh ginger
1/2 teaspoon dried basil
1 tablespoon vegan cheese powder (optional)
1 teaspoon cornstarch

1 block (aproximately 400g) tofu, cut into small pieces
1 aubergine, sliced
2 cups (approximately 300g) green beans, cut into 1-inch (2.5cm) length

Oil as required for cooking

Salt to taste

  • Drain gooseberries from syrup (I reserved the syrup to be added into the sauce), place on a baking tray, lined with foil or non-stick sheet. Place chilies on the same tray. Spray with some oil.
  • Place in oven at 275 degrees and grill until the skin is brown, about 15 minutes.

grilled chilies,enchiladas,daring cook challenge

  • Meanwhile, sautee the aubergine in a little oil until lightly golden.
  • Do the same for the green beans until tender but still crisp.

enchiladas,aubergine,green beans,daring cook challenge

  • Shallow fry the tofu until lightly golden and slightly crispy.
  • Remove chilies from oven. Let cool. Slice the chilies open and remove the seeds, scrape the flesh from the skin. Place the flesh in a blender. Discard the skin.
  • Place the gooseberries in the blender. Add ginger, tomatoes and tamarind paste. Liquify.
  • Heat 1 tablespoon oil, pour the sauce from the blender in the pan and cook for a few minutes on high heat. Then lower heat and simmer for about 15 minutes.
  • Dilute cheese powder (if using) and cornstarch in a little water. Add to the sauce. Stir continuously to avoid lumps from forming. Add water if required.
  • Taste and add syrup (or sugar) and salt as required.
  • Remove sauce from heat.
  • Reserve 2/3 of the sauce.
  • Add the vegetables and tofu to the remaining 1/3 sauce in the pan.

green beans,aubergine,tofu,enchiladas

  • In a baking dish (I used a rectangular one), laddle 1/3 of the reserved sauce.
  • Then proceed to making the tortillas.
  • Place some vegetable and tofu on one tortilla, roll with the ends tucked in and place into the baking dish.
  • Repeat for the remaining tortillas.
  • Laddle the remaining sauce to cover the tortillas.

Vegan Enchiladas

  • Bake in the oven at 200 degrees for about 20 minutes.

vegan enchiladas

  • Remove and serve hot.

vegan enchiladas

Tuesday, 13 April 2010

A pan-Southern Classic for the Daring Cooks April 2010 Challenge - Brunswick Stew

vegan,stew,potatoes,cauliflower,pinto  beans

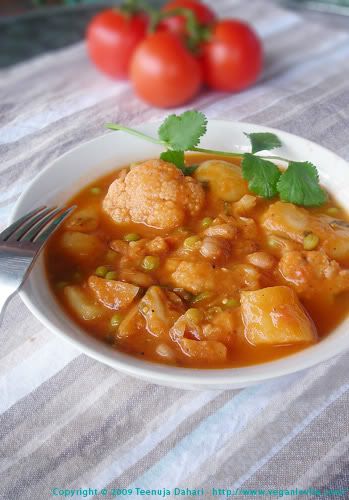
This month's Daring Cooks Challenge was a Brunswick Stew. Brunswick Stew is a classic dish from southeastern United States. Stew is a dish that I make quite often. Although I had never had a Brunswick stew before. Well, apparently we cannot call a stew a Brunswick Stew unless all the ingredients and seasonings are used according to the recipe. So, I guess mine was a vegan UnBrunswick Stew or just a Lovlie Stew. The original recipe uses chicken broth along with meat originally game. I used vegetable stock with pinto beans as meat substitute.
For more flavour I added a pinch of cumin and a dash of cayenne pepper.
If you want to add onions to the recipe, sautee them just before adding the tomato puree in the recipe below.

The Daring Kitchen

The 2010 April Daring Cooks challenge was hosted by Wolf of Wolf’s Den. She chose to challenge Daring Cooks to make Brunswick Stew. Wolf chose recipes for her challenge from The Lee Bros. Southern Cookbook by Matt Lee and Ted Lee, and from the Callaway, Virginia Ruritan Club.

THE DARING COOKS APRIL 2010 CHALLENGE: BRUNSWICK STEW

Ingredients (4 to 5 servings)

3 medium potatoes (diced)
1 medium cauliflower head (cut into florets)
1 can plum peeled tomatoes (made into puree)
2 cups pinto beans (boiled)
1/2 cup frozen peas
1 tablespoon maple syrup (or 2 if the tomatoes are more on the sour side)
1 vegetable stock cube
1/4 teaspoon ground cumin
1/4 teaspoon ginger powder (or 1/2 teaspoon fresh grated)
2 tablespoons coconut oil
Salt to taste
Dash of cayenne pepper
Water to make the sauce

  • Heat 1 tablespoon coconut oil in a deep non-stick pan. Add in potatotes.
  • Cook on medium heat until half cooked, adding water occasionally if required to avoid burning.
  • Add in cauliflower florets. Cover and let cook until both potatoes and cauliflower are almost done.
  • Remove from pan, set aside.
  • Add 1 tablespoon coconut oil. Add in tomato puree, cumin, vegetable stock and ginger. Sautee for a few minutes until starting to reduce.
  • Add potatotes and cauliflower. Stir and mix well.
  • Add beans and peas.
  • Add about 1 - 2 cups of water or more (depending on the desired sauce consistency).
  • Cover and simmer for 15 minutes until sauce starts to thicken and vegetables are cooked. Adjust heat and cook uncovered to reduce the sauce to desired consistency.
  • Add maple syrup, cayenne pepper and salt to taste.

Saturday, 27 March 2010

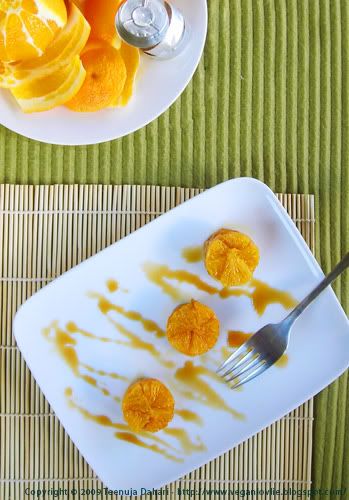
Baby Orange Tian for a Daring Bakers March 2010 Challenge

orange tian


I thought I'd never get this post up! I've barely finished taking the pictures of this today and writing this post just now. This month has been very busy. I was thinking of opting out but this challenge looked like a dessert I would enjoy, so I gave it a go.

What also attracted me into it is the homemade orange marmalade which was part of the challenge. I rarely make desserts with orange. Orange is something I just buy as juice cartons. Of the citrus family, I most of the time buy lemons, grapefruits, satsumas and clementines. So it was a nice change to have some real oranges at home after a long time!

The Daring Kitchen

The 2010 March Daring Baker’s challenge was hosted by Jennifer of Chocolate Shavings. She chose Orange Tian as the challenge for this month, a dessert based on a recipe from Alain Ducasse’s Cooking School in Paris.

THE DARING BAKERS MARCH 2010 CHALLENGE: ORANGE TIAN


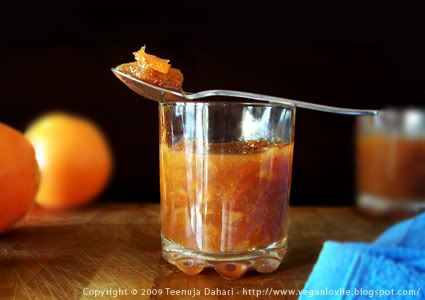
The homemade marmalade called for pectin which I couldn't find. There are some jam sugar in the supermarkets here but I didn't bother with that. I've made jams before with just the fruit and sugar and I really love it this way. I don't particularly like the jelly consistency of store bought jams and this is the reason I would make jam at home. I sometimes put a little agar flakes but this time I did not have any at home. I just used soft dark brown sugar and that was the only other ingredient apart from the oranges. More of a compote than marmalade maybe, but very nice!

The recipe suggested to slice the oranges with the peel, then blanch 3 times in water, pouring off the water each time, to get rid of the bitterness.
I, however, blanched the oranges whole, without peeling, 3 times, pouring the water off each time after 5 - 6 minutes of boiling. I found that the oranges retained more of their flavour in this way. And no bitterness at all, which I liked!

orange marmelade

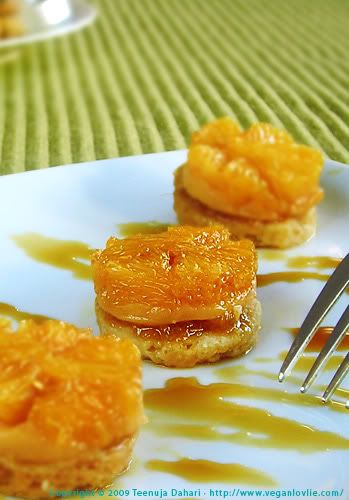
The dessert is made of different layers: a pate sablee with orange marmalade, a flavoured whipped cream topped with fresh orange segments and served with a caramel and orange sauce. It is built upside down and then unmolded so that the bottom layer (the orange segments) becomes the top layer.

My version of the tian is a bitesize baby orange tian. I made them in empty tealight holders. I usually like to keep my tealight holders for some reason after the candles melted away. I sometimes use them as cookie cutters.

orange tian

I used a pate sablee recipe that did not contain any egg. I don't think pate sablee really needs any eggs. Well, anyway, I can't remember where I got the recipe from but the proportions of
flour : icing sugar : ground almond : (cold) vegan butter is
2:2:1:1.
Also a pinch of salt.

As I did not use any ground almonds, I increased the butter by a little.

As for the whipped cream, I made thick custard instead using custard powder, soy milk and sugar.

This dessert was really nice and I liked the simple combination of pate sablee, custard, marmalade, caramel and oranges into something really yummy! It was very refreshing!

The marmalade I will definitely make again!


orange tian

Saturday, 13 March 2010

Daring Cooks Challenge March 2010: Risotto

risotto,rice,aubergine,vegan

What could be nicer than some good comfort food to warm you up from the inside out! The picture above is aubergine risotto served on half a baked aubergine. I think this has been the easiest challenge so far. I have made risotto a number of times with whatever I have on hand. This time it was aubergine and tofu, with a few other bits of vegetables.

The Daring Kitchen

The 2010 March Daring Cooks challenge was hosted by Eleanor of MelbournefoodGeek and Jess of Jessthebaker. They chose to challenge Daring Cooks to make risotto. The various components of their challenge recipe are based on input from the Australian Masterchef cookbook and the cookbook Moorish by Greg Malouf.


One of the requirements of this challenge was to make our own broth. Making vegetable broth is so easy. So easy that I don't think we need a recipe for this! I just put 2 carrots, a handful of brussel sprouts, 1 tomato, a few mint leaves, salt and pepper in a big pot of water. Bring to boil then simmer for an hour and strain. Some recipes say to simmer for 3 hours. But I did not have 3 hours, so 1 hour worked fine for me! And I used the vegetables in the risotto afterward.

The preserved lemons from the previous challenge were perfect to use in this risotto and the addition of mint leaves worked very well together with some vegan cream cheese.
I also did not use any wine in my risotto. I substituted with applesauce instead.

Aubergine Risotto served on Baked Aubergine

Ingredients (4 servings)
1 1/2 cup arborio rice
1 tablespoon vegetable oil
100ml apple sauce (I usually just puree an apple)
1 L vegetable stock
1 tablespoon vegan cream cheese (optional)
1/2 preserved lemon (from the previous challenge)
6 - 8 mint leaves, finely chopped
2 aubergines
Pinch turmeric
Chopped vegetables from the broth (optional)
Salt and pepper to taste

  • Preheat oven at 180 degrees Celsius (350F).
  • Wash and cut aubergines in half lengthwise (do not peel).
  • Spray with some oil and place on a baking tray in the oven.
  • On the bottom shelf of the oven, place another tray of water to create some steam so that the aubergines do not dry out.
  • Cook for 15 - 20 minutes or until aubergines are soft inside. Careful not to burn them.
  • Place in microwave for 40 seconds to soften the inside slightly more.
  • Carve out some of the flesh with a small knife. Keep aside.
  • While aubergines are baking, you can prepare the risotto rice.
  • Rinse rice to clean it.
  • Place oil in a non-stick pan. Add rice.
  • Stir to coat every grain with the oil.
  • Add applesauce and a little water. Cook for a few minutes.
  • Then add vegetable broth and cook for about 20 minutes or until rice is well cooked. Occasionally add water if required.
  • Add the aubergine flesh when the rice is nearly cooked.
  • Add in the chopped vegetables from the broth.
  • Lastly add preserved lemons, mint leaves, cream cheese and turmeric. Stir and mix well, cook for a few more minutes.
  • Add salt and pepper to taste.
  • Risotto should be oozy not sticky, so leave enough liquid in. It will be easier for reheating afterward as well.
  • Arrange rice on aubergines. Garnish with mint leaves and crispy tofu strips*. Bon appetit!

*Slice some tofu thinly, coat with a dash or two of turmeric powder, shallow fry until crispy. Sprinkle with salt to taste.

**Just a reminder about the Rice Cooker Giveaway from CSN Stores, closes Saturday 20th March at midnight! Leave a comment on the post there for your chance to win!**

Friday, 26 February 2010

Heaven in your mouth, they say! The Daring Bakers Challenge February 2010: Tiramisu

Lady Finger Cookies, Vegan, Fruity  Tiramisu

After the incredibly rich Nanaimo Bars of last month Daring Bakers Challenge, we are hit by yet another rich dessert which is the Tiramisu! Do you know, I still have some Nanaimo bars in the freezer! I've given up on them when some acnes started to appear! Eek!

As for the Tiramisu, the traditional one wasn't very appealing to me. Although the vegan version of Tiramisu is more healthy, the idea of caffeine, chocolate, vegan cream cheese wasn't really calling my name.
I'm not a caffeine person (I used to like coffee, moderately. But ever since I learnt about the alkaline diet benefit and coffee having a pH of 4, I've reduced caffeine to a strict minimum). What keeps me going all day is fresh fruits, green smoothies (whenever I can make them), lemon water, green tea and any herbal teas mostly. I am much more awake and energized with these high alkalising foods than I were with coffee!

So, not speculating the idea of adding any coffee or rhum in my tiramisu, I went with a fruity version that tasted wonderful. It may not be what you would expect a tiramisu to taste like but it was a much healthier refreshing dessert...

The Daring Kitchen

The February 2010 Daring Bakers’ challenge was hosted by Aparna of My Diverse Kitchen and Deeba of Passionate About Baking. They chose Tiramisu as the challenge for the month. Their challenge recipe is based on recipes from The Washington Post, Cordon Bleu at Home and Baking Obsession.

THE DARING BAKERS FEBRUARY 2010 CHALLENGE: TIRAMISU

...and I even made it soy-free! The cream part was melon and coconut milk and the sauce was a spiced tamarind-apple compote.

The lady fingers biscuits did contain some fat though; I didn't have enough time on experimenting to make this fat-free. It could probably easily have been done by replacing the fat in the recipe with apple sauce, but I haven't tried it myself, so I can't give you any feedback on this.

Spiced Fruity Tiramisu

Fruity Cream (to replace the zabliagone and mascarpone)

I am not a great fan of tofu frosting because I don't really like the taste of 'raw' tofu. I know tofu is already cooked but I don't particularly like the flavour when it's used as is in frostings. I have tried chocolate mousse frostings before made with tofu and wasn't particularly fond of it. So I had recourse to the internet to find some ideas and a search for homemade vegan whipping cream took me to this recipe (from Ricki of Diet, Desserts and Dogs) that looked brilliant. The fact that it did not contain any soy was a nice alternative as well. I adapted it for a fruitier taste and it wasn't half bad. Infact it was quite a refreshing cream. I made it very low in sweetness; the compote puree would compensate for sweetness.

Ingredients

200ml water
2cm agar strips (I buy the agar agar as a bunch long strips which I cut through with some scissors. I guess it would be equivalent to about 1/2 teaspoon of powdered agar)
200ml coconut milk
250ml melon puree (peel, cut and blend melon to obtain 250ml)
1 tablespoon maple syrup
2 tablespoons cornstarch

  • In a deep small pan, place agar and water on medium heat until agar is completely dissolved. Make sure you have all other ingredients ready by the time the agar is dissolved.
  • Stir everything (except 1 tablespoon cornstarch) into the agar mixture and whisk to combine.
  • Cook over medium heat, stirring constantly, until the mixture just begins to boil.
  • Lower heat so that the mixture is still bubbling just under the surface, and cook for 10 minutes. While it continues to cook, stir every minute or so.
  • Pour the mixture into a deep bowl. Immediately blend with your immersion blender until perfectly smooth. Set aside to cool a little.
  • When the mixture is still slightly warm but no longer hot (and still fairly liquid), sprinkle the remaining 1 tablespoon cornstarch over the top; using the immersion blender, blend again to even out the texture and get rid of any little lumps. Place the bowl in the refrigerator until the mixture is ice-cold; it will become firm. (Although I did not quite get a gel like firmness as Ricki mentioned in her recipe. But for the purpose of the tiramisu for which I did not require a proper whipped cream, the texture was alright).
  • Once again using the immersion blender, blend the gelled mixture until it is perfectly smooth and no lumps remain, but don’t blend any more than necessary. Scrape down the sides as you go.
  • Now, using the beaters (or mixer), beat the smoothed mixture until soft peaks form.
  • The cream is ready. Keep refrigerated until required for use. (I don't recommend keeping this for more than 2 days. The melon will somewhat lose its freshness and may go slightly off).


Vegan Lady Finger Cookies
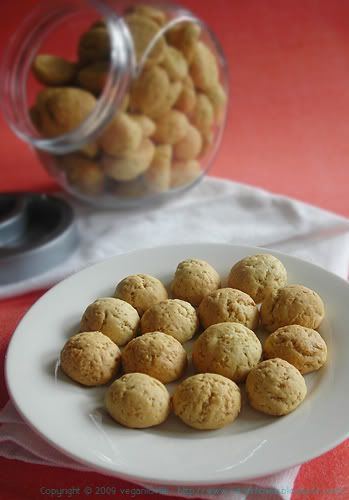
Vegan Lady Finger Cookies

I adapted from this recipe. I initially used this recipe as is but the consistency was not firm enough to be able to roll the dough as the recipe says. I would be able to pipe it but I added more flour instead, up to a cup more. I also made my Lady Finger cookies small and round. The adjusted recipe below.

Ingredients (about 24 cookies, can't really remember, but got loads!)
3 cups flour
2 teaspoons baking powder
1 teaspoons baking soda
1/2 cup non-hydrogenated margarine
1 cup vegan sugar
1/3 cup maple syrup
1/2 cup rice milk

  • To make the ladyfingers, sift together flour, baking powder and baking soda and set aside.
  • In the bowl, cream together margarine and sugar until fluffy (I just used a whisk, because I was too lazy to get the mixer out!).
  • Stir in maple syrup.
  • Slowly incorporate the flour mixture until thoroughly combined, alternating with additions of milk.
  • Cover and chill the dough for at least 1 hour.
  • Preheat oven to 180°C (350°F) and position a rack in the center of the oven. Line 2 baking trays with greaseproof paper; set aside.
  • On a lightly floured surface, roll dough into 2cm (3/4-inch) balls.
  • Arrange on prepared baking sheets, leaving a few inches of room between each cookie.
  • Bake 8 to 12 minutes, or until cookies are firm and just beginning to brown.
  • Remove from oven and let cool on baking sheets for about 1 minute.
  • When firm enough to move, transfer to a wire rack to cool completely.


Spiced Tamarind-Apple Compote
Puree

Ingredients
2 apples, peeled and finely chopped
1 tablespoon tamarind paste (seeds remove by diluting in 1/2 cup water and straining)
1 pinch ground cumin* (just a hint, about 1/8 teaspoon)
5 tablespoons sugar (or more to taste)

*If you are scared of using cumin, then use cinnamon instead but cumin pairs really well with tamarind if using just a pinch.
  • Place all ingredients in a non-stick deep pan. Simmer for 20 minutes. Adjust water if the consistency is getting too thick.
  • Remove from heat. Allow to cool a little.
  • Place in a blender or use a hand blender and make into a puree.
  • The consistency should not be too thick otherwise the cookies won't be able to absorb the liquid. So, adjust by adding water. If too watery, place back on heat and reduce to desire consistency. (I would say something in between a smoothie and juice).


Assembling the Tiramisu:

To assemble the tiramisu, I used individual cocktail glasses.
  • Dip the cookies into the compote. I found that it worked best when the compote is slightly warm. My cookies took about 20 seconds to decently absorb the compote. But do take care not to let the cookies disintegrate.
  • Place soaked cookies at the bottom of glass. Layer with a tablespoon of compote if desired.
  • Add in 2 - 3 tablespoons of the fruity cream.
  • Top with another layer of soaked cookies.
  • Then another layer of cream.
  • Sprinkle with some toasted dessicated coconut flakes*.
  • Decorate with a physalis or other small fruits.

*To toast dessicated coconut flakes, place some coconut flakes in a dry non-stick pan. (Don't add any oil or grease).
Heat on medium, stir occasionally until coconut flakes turn a light golden brown.


Share This Post

Share This Post

Related Posts Plugin for WordPress, Blogger...